Optimize HestiaCP for speed and fast WordPress

HestiaCP is an actively developed fork of popular VestaCP, whos development somewhat stalled in the last little while.

This guide in ispired by excelent post on the official HestiaCP forum by user desp:
How to optimize memory and speed?

Here are three easy steps:

1. Determine hosting/server provider speed

Use excelent YABS script to determine the speed of your hosting solution.

*Geekbench 6 update: since 27 Feb 2023 update YABS uses Geekbench 6 as default benchmark – we’ll use flag -5 to run version 5 so we can compare the results.

wget -qO- yabs.sh | bash  -s -- -5

Or if you just want Geekbench score (skipping disk (fio) -f and network (iperf) -i tests):

wget -qO- yabs.sh | bash -s -- -5fi

Test will return something like this:

Geekbench 5 Benchmark Test:
---------------------------------
Test            | Value                         
                |                               
Single Core     | 832                           
Multi Core      | 867                           
Full Test       | https://browser.geekbench.com/v5/cpu/<test_id_number>

Single core performance is the score we are interested in:

1000 or moreGreat core performance, very good provider
700 – 1000Normal performance, okay provider
500 – 700Normal performance, can be better
500 or lessAwful performance, avoid the provider

Keep in mind, it’s the performance and page speed we’re after, if this is storage/backup optimized server with SAS (spinning) drives, lower numbers are completly accaptable.

Disk performance (IOPS):

fio Disk Speed Tests (Mixed R/W 50/50):
---------------------------------
Block Size | 4k            (IOPS) | 64k           (IOPS)
  ------   | ---            ----  | ----           ----
Read       | 22.76 MB/s    (5.6k) | 173.71 MB/s   (2.7k)
Write      | 22.76 MB/s    (5.6k) | 174.62 MB/s   (2.7k)
Total      | 45.52 MB/s   (11.3k) | 348.33 MB/s   (5.4k)
           |                      |
Block Size | 512k          (IOPS) | 1m            (IOPS)
  ------   | ---            ----  | ----           ----
Read       | 170.55 MB/s    (333) | 213.61 MB/s    (208)
Write      | 179.61 MB/s    (350) | 227.84 MB/s    (222)
Total      | 350.16 MB/s    (683) | 441.45 MB/s    (430)
1000 or moreGreat performance, SSD/NVMe with high IOPS

RAM is not as important unless you’re running into heavy swapping.

Now that we established our KVM VPS / dedi server is fast enough, we can move on to the next step.

2. Lean HestiaCP install

Classic installation of hestiaCP will result in good enough general setup, that works for most, but it costs us performance. It uses Apache as webserver and Nginx only for caching proxy. Apache is slow.

So let’s trim of the fat and install only
Nginx + PHP + MySQL/MariaDB – without Apache.

Let’s use the handy Install string generator:

For example:

wget https://raw.githubusercontent.com/hestiacp/hestiacp/release/install/hst-install.sh

sudo bash hst-install.sh --apache no --phpfpm yes --multiphp no --vsftpd no --proftpd no --named no --mysql yes --postgresql no --exim yes --dovecot yes --sieve no --clamav no --spamassassin no --iptables yes --fail2ban yes --interactive yes

This will give us minimal installation, without BIND (DNS), and only EXIM as mailing solution.

3. Set WordPress template and caching

Login to control panel and your user.

Set tamplate

  • Edit Web domain → Advanced Options → Web Template → WordPress

Set caching

  • Enable Fast CGI Cache
  • Set Cache duration → 5m, 10m
    (if you have a lot of dynamic content, you can try microcache of 30s).

That’s it on the HestiaCP side, now your website should be crazy fast. For further optimisations, look into optimizing WP plugins and theme code.
HestiaCP fresh install & cleanup

HestiaCP is an actively developed fork of popular VestaCP, whos development somewhat stalled in the last little while.

There’s a couple of steps we can take to make our crispy fresh HestiaCP install even crispier!

Depending on your needs, you can make a full install and then remove unnecessary packages, or you can opt to not include it in the installation in the first place:

Install options

First, we need to download the installation script:

wget https://raw.githubusercontent.com/hestiacp/hestiacp/release/install/hst-install.sh

No we can add additional parameters to install only what we need
(-h lists all available options or use the Install string generator):

bash hst-install.sh -h

Installing without Bind and with Multi-PHP support:

bash hst-install.sh -k no -o yes

You can of course customise your installer, depending on your specific server use case (for DNS cluster, there is no use of vsftp/apache/nginx and so on).

Set host domain SSL certificate (Lets Encrypt)

To set or update host domain certificate, first generate Lets Encrypt certificate for a specific hostname (domain) for one of the users in the GUI control panel or CLI, then run the following command in CLI:

Parameters: [USER] [HOSTNAME]
v-update-host-certificate admin domain.com

Restore user or only specific domain

Restoring complete user data from a HestiaCP (or VestaCP) backup:

v-restore-user admin admin.2020-07-10.tar

We can also restore only a specific domain, database, or any other part of the user data from the backup tar file. Let’s say we just want to restore domain.com and its respectful database admin_domaindb, while saving the log file to restore.log:

USER BACKUP [WEB] [DNS] [MAIL] [DB] [CRON] [UDIR] [NOTIFY]
v-restore-user admin admin.2020-07-10.tar 'domain.com' 'no' 'no' 'admin_domaindb' 'no' 'no'  yes >> /usr/local/vesta/log/restore.log 2>&1

Change domain and DB owner

To move domain to another user (change the owner of the domain):

v-change-domain-owner domain.com newuser

To move database to another user (change the owner of the database):

v-change-database-owner db_name newuser  

Get the DKIM public key

Run the following command to get the DKIM public key:

v-list-mail-domain-dkim USER DOMAIN [FORMAT]  

Use the public key in TXT record in your DNS:

mail._domainkey IN TXT "v=DKIM1; k=rsa; p=<your_public_key>"

UFW or iptables redirect (forward) to new IP

A simple steps for redirecting, forwarding or tunnelling all traffic from one host IP to another in Ubuntu.

Using UFW

Edit /etc/default/ufw to accept forwarding requests:

 DEFAULT_FORWARD_POLICY="ACCEPT" 

Edit /etc/ufw/sysctl.conf to allow IP forwarding:

net.ipv4.ip_forward=1

Edit /etc/ufw/before.rules and add the following before *filter options:

*nat
:PREROUTING ACCEPT [0:0]
-A PREROUTING -p tcp --dport 8080 -j DNAT --to-destination external_ip:8080
COMMIT 

On some configurations, MASQUERADE option needs to be enabled as well:

*nat
:PREROUTING ACCEPT [0:0]
:POSTROUTING ACCEPT [0:0]
-A PREROUTING -p tcp --dport 8080 -j DNAT --to-destination external_ip:8080
-A POSTROUTING -j MASQUERADE
COMMIT 

Reload and commit the new rules:

ufw reload

Using iptables

Edit /etc/sysctl.conf to allow IP forwarding (add or uncomment):

net.ipv4.ip_forward=1

Save the existing rules using iptables-save:

iptables-save > /etc/iptables/rules.v4

Edit /etc/iptables/rules.v4 and add the following before *filter options:

*nat
:PREROUTING ACCEPT [0:0]
-A PREROUTING -p tcp --dport 8080 -j DNAT --to-destination external_ip:8080
COMMIT 

Again, if you need to MASQUERADE, add the line before the COMMIT:

:POSTROUTING ACCEPT [0:0]
-A POSTROUTING -j MASQUERADE

Restore the edited rules with iptables-restore:

 iptables-restore < /etc/iptables/rules.v4

To make the rules persistent on the system reboot, use iptables-persistent or custom solution with on-boot scripts.

Recursively chmod files (or folders) only

Modifying permissions with chmod and using recursive -R tag is handy, but it will be executed on both, files and folders:

chmod -R 755 /path/to/directory

To change permissions on files (or folders) inside directory structure, we can use the following commands:

Files only

cd /path/to/directory
find . -type f -exec chmod 644 -- {} +

Folders only

cd /path/to/directory
find . -type d -exec chmod 755 {} +

VestaCP fresh install cleanup

There’s a couple of steps we can take to make our crispy fresh VestaCP install even crispier!

Depending on your needs, you can make a full install and then remove unnecessary packages, or you can opt to not include it in the installation in the first place:

Install without Softaculous and PostgreSQL

First, we need to download the installation script:

curl -O http://vestacp.com/pub/vst-install.sh

No we can add additional parameters to install without Softaculous and PostgreSQL:

bash vst-install.sh --softaculous no --postgresql no

These are two packages we don’t use so we usually skip them. You can of course customize your installer on VestaCP’s official advanced install settings site, depending on your specific server use case (for DNS cluster, there is no use of vsftp/apache/nginx and so on).

Remove Softaculous

In case you already installed Softaculus and wish to remove it, you can disable it in the web GUI, but it usually still sends update email notifications. To completely disable it, run these three commands:

/usr/local/vesta/bin/v-delete-vesta-softaculous

And remove the crontab files:

rm -rf /etc/cron.d/softaculous
rm -rf /etc/cron.d/softaculous2

Remove pre-made user packages

We can do some additional cleanup and remove the (usually unused) user demo packages:

/usr/local/vesta/bin/v-delete-user-package palegreen 
/usr/local/vesta/bin/v-delete-user-package gainsboro 
/usr/local/vesta/bin/v-delete-user-package slategrey

Restore only specific domain

Another not so well documented VestaCP feature is restoring only a specific domain or database from the backup tar file. So let’s say we just want to restore domain.com and its respectful database admin_domaindb, while saving log file to restore.log:

USER BACKUP [WEB] [DNS] [MAIL] [DB] [CRON] [UDIR] [NOTIFY]
v-restore-user admin admin.2019-08-14.tar 'domain.com' 'no' 'no' 'admin_domaindb' 'no' 'no'  yes >> /usr/local/vesta/log/restore.log 2>&1

VestaCP/HestiaCP Office 365 SRV DNS records

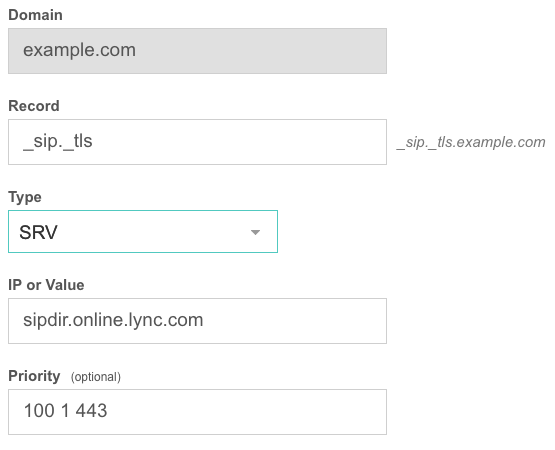
You might be wondering, how to enter SRV values into your fresh VestaCP/HestiaCP install. Bellow is an example for Office 365 settings:

TypeTargetProtocolServicePriorityWeightPort
SRVsipdir.online.lync.com_tls_sip1001443
SRVsipfed.online.lync.com_tcp_sipfederationtls10015061

You might be tempted to put weight and port into IP/Value field (as this is what is suggested on Microsoft’s tutorial page), but that’s not how it works in VestaCP/HestiaCP. Instead, put them together with the priority as shown bellow.

Records in VestaCP/HestiaCP control panel

Domain: example.com
Record: _sip._tls
Type:  SRV
IP or Value: sipdir.online.lync.com.
Priority (optional): 100 1 443
Domain: example.com
Record: _sipfederationtls._tcp
Type:  SRV
IP or Value: sipfed.online.lync.com.
Priority (optional): 100 1 5061

That’s it for the SRV values, of course, don’t forget your A, CNAME and TXT!

ESXi evaluation license reset

Older versions of ESXi are still amazing pieces of server software that were made available for free back in the days, but today there is no official way to get new licences from VMware. So here is a neat trick how to do it through the console (you need to have the SSH access/tech support mode enabled):

ESXi 3.5 / 4.x

rm /etc/vmware/vmware.lic
rm /etc/vmware/license.cfg

services.sh restart

You can also add first two lines to your /etc/rc.local file so your evaluation period gets restored every time you reboot the physical host machine.

Bonus: sometimes it’s easier to just enter licence, here is one you can use:
HH09H-6A015-N6000-0RCY6-CPZQH

ESXi 5.x

rm -r /etc/vmware/vmware.lic
cp /etc/vmware/.#license.cfg /etc/vmware/license.cfg

/etc/init.d/vpxa restart
services.sh restart

Your evaluation licence should now be reset for another 60 days.